Bathtub Tray Table
This tutorial has step-by-step photos with a supply list to make your own bathtub tray table easily!
If you’ve followed my blog for awhile, you know how much I love soaking in the bathtub. It’s a nightly ritual for me, especially during cold months. I’ve previously shared a tutorial for my pallet wood tub table. I’ve been using it for several years and it still worked great, but it wasn’t looking so good anymore. I’m guilty of using it as a spot to let things I’ve painted sit to dry on, and paint was all over it.
Since the bathroom is getting a remodel, I thought it was time to make a new one. Check out the tutorial showing how I did it!

What I Used:
- 1 in. x 12 in. x 3 ft. Edge-glued pine board
- 1″ x 2″ Pressure-treated board
- Stainless steel 3/4″ wood screws
- Minwax Early American wood stain
- Foam paintbrush
- Venom disposable gloves *These gloves won’t let the wood stain seep onto your hands like cheapo gloves do.
- Dixie Belle’s Gator Hide
- Dixie Belle’s sponge applicator
- Handles x 2
How to Make a Bathtub Tray Table
1. Measure the width of your tub from edge to edge. Also measure the inside width.
This will tell you where the support braces need to be placed so the table doesn’t slip into the tub.

2. Cut the length of the board to the outside width of your bathtub.
TIP – Home improvement stores will usually cut it for free.

3. For the support brackets, cut two pieces of 1″ x 2″ pressure-treated board since those are the boards most likely to come in contact with water.
Use the inside measurement of the bathtub to determine where the boards should be spaced.

4. Drill a pilot hole through the ends of both boards.

5. Insert the screws into the holes and tighten with a screwdriver.
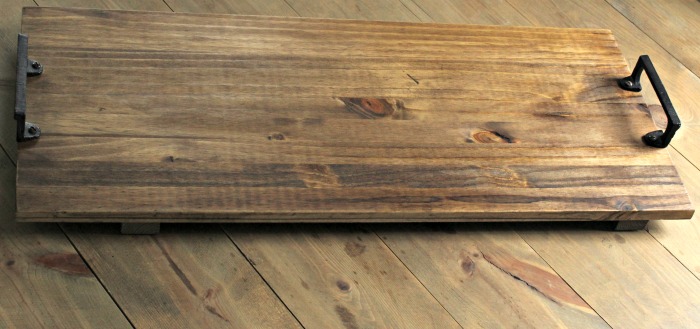
6. Stain the bathtub tray with your choice of wood stain colors. I used Minwax Early American.

6. To repel water, apply Gator Hide on both sides of the bathtub tray.
TIP – The easiest way to apply sealer is with a sponge. Just dip it in Gator Hide, apply two light coats, and let dry well between coats.

TIP#2 – To prevent the lid from sticking to the container, put a sandwich bag over the container before screwing on the lid. Works like a charm!

7. Attach handles, if desired.
This time, I wanted handles on my bathtub tray. I attached them right at the edges.

That’s it! Now let’s see how it looks on the bathtub …
I love how it turned out! The combination of rustic wood against the subway tile is beautiful and is exactly how I envisioned it.


Tell me what you think! Are you a bathtub soaker who would use this?

Here’s another fun project for the bathroom that only takes literally a minute to make. Find the supplies HERE.
Vaya con Dios,


I miss having a bath tub very much. Hopefully I’ll have one again one day. Then I’ll need such a beautiful tray. Thank you for the tutorial, Angie!
I don’t think I could stand not having a bathtub, Julia. You have my sympathy!
That is looking so beautiful, Angie! With my knee, it has been a very long time since I have had a soak in a tub…maybe soon!
I hope you can soak in a tub again soon, Linda!
Yes indeed i am a bathtub soaker, i would love this tray. Thanks Angie for this post.
You should make it Marlene! It’s an easy project.
Angie, It’s a very attractive rustic tub tray. I, however, am not a tub-sitter. I prefer showers–the quicker the better!
I’m curious, though, did you get a new tub or just have the old one re-surfaced? It looks really shiney. My tub is not in good shape at all but the cost of replacing it makes me consider having it re-surfaced. Except that the stuff they use is so toxic and odorous.
Can’t wait to see the bathroom all done!
We did get a new one Naomi. My old one was pitted and wasn’t worth resurfacing.
What a great idea! I need this for my bathtime. Thank you for sharing.
I need this!!!
Brilliant idea with the lid for Gator Hide!!
You’re full of great ideas.. LOVE this one too!
I’m in the midst of this project but feeling a little silly at the moment that I didn’t notice that 3/4 “ screws won’t make it through an inch wide piece of wood. Bummer. I’ll have to make another masked run to the hardware store soon I guess. Unless I’m missing something..?
There isn’t a picture of the brackets attached to the bottom of the board. Should the screws be recessed or something?
Look for shorter screws or use slightly thicker pieces of wood on the bottom.