Old photo frames are plentiful in thrift stores, so I always keep my eye out for frames with nice details that I think would sell well, if painted and distressed. One thing I’ve discovered is that frames seem to sell better without the glass. I have no idea why! If you search “photo frames” on Etsy, you’ll see loads of painted frames grouped together, without the glass. I’ve sold many sets myself like that and I’m always glad not to have to worry about the glass breaking in transit.
What that means though, is that I’m left with a lot of glass pieces stacking up in my workshop. Until now, I had no idea what to do with them, but I hated to throw them away. I finally came up with a project to start using them.
Junk Glass Framed Photo

I love antique photos, so that’s what I’m using in my project, but you could use a regular photo as well. If you want a “modern” photo to look older for this project, just have it printed in sepia tone.
My background paper is from a 1920 magazine. I loved the header on this page, but it had an image of then President-Elect Warren Harding on it and I wanted regular print where my photo would be placed, so I spliced another page to it.

If you love antique photos, but don’t have any to use, I’ve got several you can print HERE. I sold the original photo used in today’s project, so I just just printed this image on plain copy paper and cut it out. You’d never know it isn’t the original to look at it.
You can use either 1 or 2 pieces of glass – I’m using 2 so that the papers are “sandwiched” between the glass, but if you only have one piece of glass, that’ll work too, with a little variation.
I created mine to rest in an easel, rather than hang on a wall.
Here’s what you’ll need to make one:
2 pieces of glass
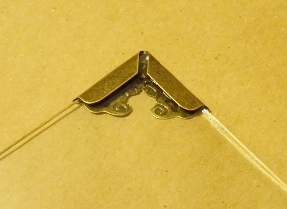
4 metal corner embellishments (Tim Holtz product in the scrapbook section)
($4.79 for 12, using 40% off coupon)

photo (print antique photo images HERE)
newsprint, dictionary page or other paper with an aged look (cut to size of glass)
scrapbook adhesive mounting squares
glue
Directions:
1) Attach 4 adhesive mounting stickers to the 4 corners of glass
2) Attach your background paper to the stickers over the glass
3) Put mounting stickers on 4 corners of photo
4) Attach photo to background paper

5) Put just a small dab of glue (I used E-6000) to just the tip of the 4 corners of the 2nd piece of glass
6) Place metal corners around the 4 corners of the glass – lay it down so that the metal corners can dry in place

7) Once dry, fold the edges of the metal corners around the edge of the glass
8) Put the 2 pieces of glass together and rest in an easel to display

You’ll notice I didn’t attach my 2 pieces of glass together. I did this so that I could easily switch out the papers and photos if I wanted and also because the metal corners don’t have enough of a “lip” to fold over 2 pieces of glass.
If you only have one piece of glass to work with, that works well too, I’d just cut a piece of poster board for the back piece. The metal corner embellishments will be able to wrap around both the glass and the poster board.
Another quick, easy and inexpensive project that uses up junk glass and old papers that may otherwise be trash.
Thanks so much to all of you who linked up at yesterday’s That’s the Ticket Link Party! The party is open all week, so keep linking up those creative projects as you finish them! Don’t forget, my co-hosts and I have 4 different giveaways too, so visit each of my costs to enter to win theirs! If I wasn’t one of the co-hosts, you can bet I’d be entering their giveaways, because they are FABULOUS!
Go HERE to enter my giveaway and get the links to my co-hosts.

Have a wonderful weekend!
I can frequently be found visiting these parties.
Monday
http://betweennapsontheporch.blogspot.com Metamorphosis Monday
http://diyhshp.blogspot.com/– More The Merrier Monday
Tuesday
http://www.knickoftimeinteriors.blogspot.com/ Knick of Time Tuesday
http://linda-coastalcharm.blogspot.com/ Nifty Thrifty Tuesday
http://shoprubyjean.com/Sew-Crafty Tuesday
http://sassysites.blogspot.com/Trash to Treasure Tuesday
http://www.homemakeronadime.com/Market Your Biz
http://shoprubyjean.com/Sew-Crafty Tuesday
http://sassysites.blogspot.com/Trash to Treasure Tuesday
http://www.homemakeronadime.com/Market Your Biz
Wednesday
http://micheleravendesigns.blogspot.com/ Primp Your Stuff Wed
http://savvysouthernstyle.blogspot.com/ Wow Us Wednesday
http://www.thethriftyhome.com/ Penny Pinching Party
http://mrshinesclass.wordpress.com/Mrs. Hines’ Class
http://www.thethriftyhome.com/ Penny Pinching Party
http://mrshinesclass.wordpress.com/Mrs. Hines’ Class
Thursday
http://thebrambleberrycottage.blogspot.com/ – Time Travel Thursday
http://bec4-beyondthepicketfence.blogspot.com/ Under $100 Link Party
http://www.theshabbycreekcottage.com/ Transformation Thursday
http://www.the36thavenue.com// Share Awesomeness Thursday
http://thriftydecorating-nikkiw.blogspot.com/ Thrifty Thursday
http://faithgracecrafts.blogspot.com/ – Pearls and Lace Thursday
http://radcrafter.com/ – Thingamajig Thursday
http://www.theshabbycreekcottage.com/ Transformation Thursday
http://www.the36thavenue.com// Share Awesomeness Thursday
http://thriftydecorating-nikkiw.blogspot.com/ Thrifty Thursday
http://faithgracecrafts.blogspot.com/ – Pearls and Lace Thursday
http://radcrafter.com/ – Thingamajig Thursday
Friday
http://frenchcountrycottage.blogspot.com/ Feathered Nest Friday
http://twenty-eight-0-five.blogspot.com/ Potpourri Party
http://www.atthepicketfence.com/ Inspiration Friday
http://www.atthepicketfence.com/ Inspiration Friday
http://commonground-debrasvintagedesigns.blogspot.com/ – Vintage Inspiration Friday
http://www.stuff-and-nonsense.net/ – Stuff and Nonsense
http://www.myrepurposedlife.net – Catch as Catch Can
http://joyfulstamper.blogspot.com/ –
http://www.myrepurposedlife.net – Catch as Catch Can
http://joyfulstamper.blogspot.com/ –
Saturday
http://funkyjunkinteriors.blogspot.com/ Saturday Nite Special
Sunday
http://stylishonceagain.blogspot.com/ – Restyled Sundays
http://my1929charmerblog.com/ – Sunday’s Best @ My 1929 Charmer
http://www.sistersofthewildwest.blogspot.com/ -Sister Sunday Link Party
http://my1929charmerblog.com/ – Sunday’s Best @ My 1929 Charmer
http://www.sistersofthewildwest.blogspot.com/ -Sister Sunday Link Party
Due to unethical websites stealing content, I can no longer provide a full RSS feed. I work too hard to produce original and inspiring content to have it stolen by others. Thank you for your understanding – I appreciate each one of you that take time out of your day to visit Knick of Time!!


Great way to put all the pieces to work – no waste. The reason I usually end up with an empty frame is because (opps) I broke the glass!
~Bliss~
GREAT idea, I have lots of leftover glass also. Will be doing this!!
Have a God Filled Day
Shirley
I love this idea! I bought a “floating frame” at Gabe’s so I get the concept of it, I think it looks so neat!
Rondell
You are just so clever…adorable idea. I have lots of glass too.
Thanks for getting rid of the music.
You know…this is clever. I have to find those clips. I have an original magazine from the year (many moons ago!) that I was born in….cute idea!!!
hi Angie … I have glass, old papers, maybe some pictures so just need to find the corners. Love this look and thanks for sharing. Looking forward to a fun That’s The Ticket Link Party. I think I am all linked up and have Ticket #60.
Blessings,
Audrey Z.
Very cute… loved those Tim Holtz corners and now I have a darn good reason to buy them! 🙂
Great idea Angie!
You are amazingly innovative! I have to find those clips…hope I can find it online -:)
Like do you EVER SLEEP??? You have some of the coolest most amazing ideas! I know you stay awake all night with your mind just coming up with all kinds of neat things to do! I’d never have thought of the double glass stuck together with those neat corners. So cute!!!
Can’t wait to see what you dream up next!!!
Blessings!
Doni
I discovered your post on Ms Hines linky party. What a fabulous idea for the glass! Thanks for sharing!
Jennifer
@Decorated Chaos
http://decoratedchaos.blogspot.com
I love this idea! You just opened up a whole new world for me. I have so many frames that I don’t want anymore. So, I should get busy painting them to sell and keeping the glass for myself or to sell. I’m so excited! Thank you for sharing at Show & Tell.
Sharon @ mrs. hines class
What a great idea. I’ve been saving glass but never knew what to do with it all. Now I know.
I love this idea! I just acquired some very old magazines from the 1900’s that would be great for framing. Thanks for the inspiration! ~Angie
What a fabulous idea!
Kathy