Galvanized Farmhouse Style Bucket Planter
Life in farm country has its ups and downs depending on the weather.
The situation around my farmhouse has been looking grim for the last several weeks because of the severe lack of rain.
Our grass had turned very brown and many patches of it had died.
The situation is far more severe for farmers who need that rain for their crops.
I was singing “hallelujah” because yesterday we finally got bucketloads of rain. I’m sure we still need a lot more to catch up, but this was a good start.

Here’s a project to celebrate farmhouse life!

I used a farmhouse Chalk Couture transfer. Chalk Couture has tons of designs available.

So … let’s make this fun Galvanized Farmhouse Style Bucket Planter!
Supplies Needed:
Chalkology paste (In your choice of color – I used white.)
Here is an awesome video showing how easy Chalking is!
How to make a Galvanized Farmhouse Style Bucket Planter:


Getting Started with Chalk Couture
Chalk Couture is one of the easiest products to use to make amazing custom home decor and gifts.
Here are a few tips that will help you get started:
- Trim the transfer if needed along the cut lines.
- Remove the transfer backing by peeling it off from side to side so you don’t distort the transfer.
- Mark the back of the backing paper on the non-glossy side so you know which side not to place the transfer back on when you’re finished.
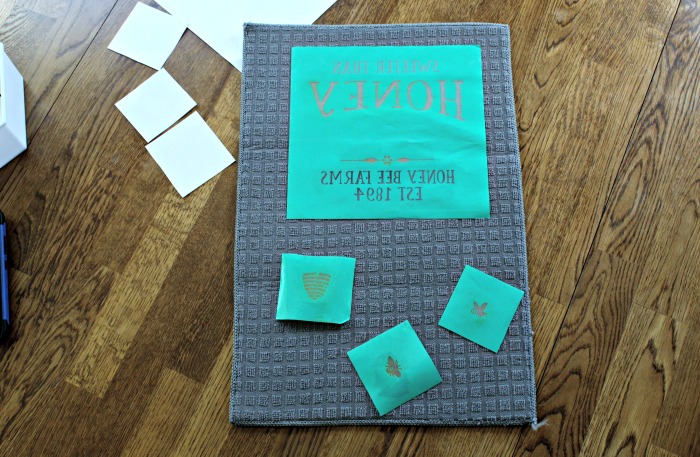
- Place the transfer sticky side down on a fuzzing cloth and press the transfer down. Repeat a few times. This is to remove a little bit of the stickiness so it doesn’t permanently adhere to your surface.
- Remove the transfer from the cloth and smooth it onto your surface, making sure to smooth any air bubbles out.
TIP – Leave a tiny corner of the transfer not pressed down so it’s easier to remove it when you are finished.
- Stir the Chalkology paste or ink with a stir stick or plastic utensil. It should be a consistency similar to yogurt. If it seems too dry, mist it with water in a sprayer.
- Dab the Chalkology Paste or ink on your transfer and use a squeegee to spread it across the design. Make sure to remove any lines by going to to bottom, the left to right.
- Work quickly so the paste doesn’t dry out.
- If you’re working with a large transfer, keep some damp paper towels on hand to lay on top of the paste to keep it from drying out while you work on another section.
- Scrape excess paste off the squeegee back into the jar.
- If you got any paste outside the transfer area, you can clean it up immediately with a damp cotton swab.
- Gently pull the transfer straight up from 2 corners and allow the design to dry. You can also use a blow dryer or heat tool to speed up the process.
- To clean your transfers, rinse in water then place on non-stick mat.
- Use a Clorox wipe to remove any paste or ink remaining. Flip it over and repeat on the other side. Place the transfer sticky side up to air dry on a flat surface.
TIP – I put my transfers on a Dollar Tree dish mat to dry.

- Use spray sealer to make your design permanent.
TIP – Use a small amount of furniture wax on wood surfaces with a paper towel before applying the transfer. This protects the transfer and makes it easier to remove.
That’s it. Done!!
**More How to Transfer tips are HERE.
Now I want … two :), which is easy to do with transfers, thank goodness!
Find more transfer projects HERE.

Vaya con Dios,

![]()


I love this bucket! So pretty with the flowers!
Thanks!
I love what you did with the galvanized bucket and the flowers are beautiful in it!
I have a question about the Chalk Couture. Are they like stencils and can be used over and over?
Thank you
Yes, they can Joan. See my first post about them that gives step-by-stepinfo. here-https://knickoftime.net/2018/06/getting-started-with-chalk-couture-a-video.html
A person just gotta love them galvanized buckets. I certainly like what you done with yours along with them beautiful flowers you have to go with. That would make for a cute ‘Welcome’ bucket
Oh, the Wonderful inspiration you give to us; Thank You
That is one cute little planter, Angie. I don’t understand, though, how this chalk transfer method is different than working with regular stencils. Other than the product used to “paint” the design, why is this easier or better? I have read the instructions for using the chalk transfer method, but I’m still not sure I understand why I would choose to use it over a conventional stencil method. Can you enlighten me?
It really isn’t different Naomi. You just get less likelihood of bleed under the using the adhesive backed transfers and they are reusable like stencils.
Too sweet and I love the flowers too!
Thanks so much Nancy!
Hi, love your post. I would like to invite you to come share this on the CLASSY FLAMINGOS BLOG PARTY held each Tuesday evening thru Friday. You’ll get large picture exposure and shout outs on all of my social media sites. And if you get PINKED you get even more exposure! I hope you’ll come by. poinsettiadr.com
Your farmhouse planter is beautiful! I will be featuring it this Sunday at Merry Monday! Hope to see you at the party!
Love this look, Angie! And the flowers look beautiful in it! Visiting from Sweet Inspiration!
Thanks Gail!