I hope you rummaged through you recycling bin yesterday, and have gotten started making yourself a Cookie Cutter Window Candy Jar – you could whip up several of them in an evening! I’ve been happily munching on the soft peppermints in my jar for several days. At this rate, I’ll gain 10 pounds before November has even ended!
Day 2 of the 12 Days of Christmas celebration won’t make you gain any weight at all, but it might make you want to do some baking. If you are like me, you’ve bought lots of special shape cake pans over the years, used them once, and then they took up space in your cabinet for the next 5 years, until you finally donated them. I’ve had heart-shaped pans, Winnie-the-Pooh, a ladybug, and the ones shaped like the bottom of a dress for a Barbie doll cake. Considering how much I dislike cooking and baking, you’ll be surprised to learn that I used to go ALL OUT on my kid’s birthday cakes when they were little. Do I still have any of those pans? Nope…they all either were sold in a yard sale, or got donated. I never made the same cake shape twice.
The good news is, special shape pans are a common find in thrift stores (I saw 2 just yesterday), and that’s what you’ll need for today’s project, because we’re going to make a magnetic Christmas chalkboard, and it couldn’t be easier.
Let’s Get Started!
The only supplies needed are:
*Special Shape Cake Pan
*Chalkboard Paint (not spray paint)
*paint brush (about 3/4 inches wide is a good size)
*1 D-ring hanger
*E6000, or other strong glue
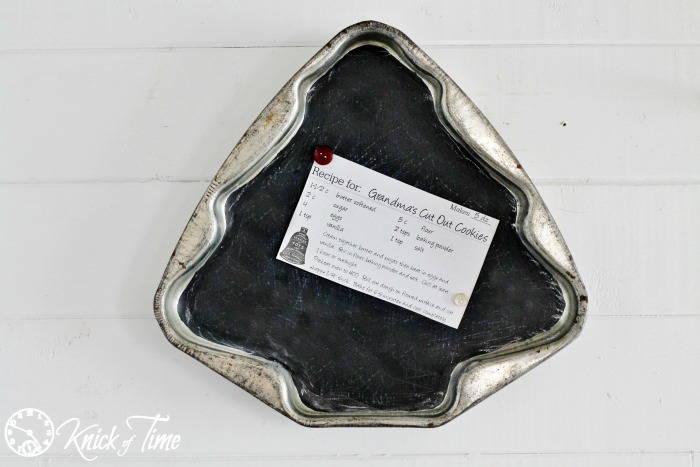
I bought 2 of these Christmas tree-shaped pans last year at a thrift store. I didn’t have a plan for them, but I’m actually amazed I remembered that I had them to use, and I’m even more amazed I was able to find them in my disaster zone of a workshop.
You don’t need to tape anything off, or do any special prep first – just grab your paintbrush, and carefully follow the shape inside the pan. Do a light coat first, let it dry, then do a 2nd and 3rd coat, if needed. I did two coats of paint on mine.
You could use chalkboard spray paint,if brush strokes bother you on chalkboards, but you’d either need to do a lot of taping to just paint the inside of the pan, or you’d have to paint the whole pan. I don’t mind brush strokes, since I don’t write on my my chalkboards that much anyway – I mainly like the look of them, and a few brush strokes won’t hurt if you do write on yours.
Once the paint is dry, flip your pan over, and glue the flat part of the d-ring hanger on the back, so you can hang your chalkboard. You could also glue some twill tape in a loop to use as a hanger.
That’s it – you are done with the pan! Allow the paint to cure for a day or so, then prime it with the side of a piece of chalk before writing on it.
I’m an awful chalkboard artist, so I opted to use my pan as a magnet board instead. The chalkboard background just looks cool.
I needed a cute little recipe card to hang on it, so I created one using the antique ledger pages I shared with you HERE. While I had the E600 out, I glued magnets to the back of some small buttons to use with my recipe card.
Here’s a blank printable. You can hand write your recipe, or use Picmonkey to add text.
I thought you all might get a kick out of seeing my fancy photography set-up in my kitchen. There’s a small section of wall between my pantry and the kitchen sink, and I like to use it to take photos, because it gets great natural light from the window above the sink, and the white wall panels make a nice backdrop. The only problem is, there’s a power outlet that sits just a few inches above the counter, so I’m always trying to find ways to hide it in photos. The other problem is, when I’m shooting pictures of something that hangs on the wall, I already have a screw in the wall where a larger plate hangs under the smaller one you see below, but that screw is just a little too high to capture what’s on the wall AND things on the counter, and I’ve already put too many screws holes into this wall (you can see at least 4 here), which I have to Photoshop out all the time. Rather than add more holes, I decided to make a fake old wood counter, by putting a board on top of bowl. It hid the outlet and it closed some of the gap for me. Whatever works, right?
I was too lazy to carry the board back out to the workshop after shooting these photos, so I turned it into the Industrial Farmhouse Wall Bins I showed you last week. I’m so glad I did, because I am so loving how they turned out.
Two days down, and 10 more to go! My projects aren’t all finished yet, so I better get busy!
{Click HERE to see all of the 12 Days of Christmas – the link will be updated with the latest projects each day!}


This is a fun idea and a good re-use project, Angie! And I think your counter prop works perfectly!
I love your chalkboard cake pan! Super cute idea!
You’re the best! Love this. I have a heart pan so I guess I’ll make one for Valentines Day.
Thanks Karen! The silly thing is, after donating so many of them to thrift stores over the years, now I’m back to buying them at thrift stores again!