I used to be super duper organized when it came to mundane tasks…like paying bills, meal planning, and Christmas and grocery shopping.
Used. To. Be.
~ On Dec. 26th every year, I started my new Christmas shopping list, so whenever the kids mentioned something they wanted, I added it to the list, and scouted for bargains throughout the year. When I purchased something on the list, I changed the typed item into bold print, so I knew I had purchased it.
~ I scouted the weekly grocery sales, and made two-week meal plans based on what was on sale.
~ I kept an eagle-eye on our finances, so I never made a late payment, and knew exactly what I needed to pay when.
And then a few things happened that turned me into someone who needs an organization intervention.
1. We moved, and for no good reason, I’ve never gotten a desk space organized that was really functional, so I could be super organized again. I’ve been flying by the seat of my pants for 3 years. Yes…3 years.
2. My online shop business grew a ton the year we moved, and I was working about 15 hours a day trying to keep up.
3. And, I started blogging … A LOT. Let’s face it. Blogging is more fun than meal planning, by a long shot.
All that to say, my bills are a disorganized mess, I did most of my Christmas shopping in December this year, I forgot to give a few gifts that I had put away, and I haven’t written a meal plan…in 3 years. Seriously.
I finally decided enough was enough – I have to get more organized, so I set out to create an organization station, without spending any money to make it!

I had this salvaged cabinet piece that was given to me by the same friends that gave us the beautiful antique door that we used on our shed-turned-guest room remodel.

I was envisioning something similar to the salvaged wood display shelf I made last year (see that post HERE)

I grabbed all the pallet pieces that were leftover after making the Wall Hooks Storage Rack and Floating Shelf, and arranged them under the cabinet front, to get an idea of the layout, then I cut the pallet pieces to fit inside the larger opening. I wasn’t crazy about the finish on the cabinet front, so I painted it the same pretty yellow I used on the Doll Cradle I shared recently.

I didn’t have enough pallet wood to fill the whole inside, so I used to thicker beams that my husband had removed from our bedroom ceiling for the two sides – that ended up being a bonus, as you’ll see. I cut a piece of sheet metal, and screwed it into the smaller opening. Here’s what it looks like on the back side.

Now, I have a small magnet board to hold stamps, notes and photos.

There’s a gap behind the magnet board, and I didn’t want that space to go to waste, so a thin piece of wood was added to form a small hidden shelf. It’s just big enough to hold my stapler on one side, and my paper cutter on the other! I don’t use them often, so it’s nice to have them within easy reach, without taking up any extra space.

My calendar gives me the month at a glance, and I made a printable week at a glance pages, to help keep me on track. I should have done this years ago.
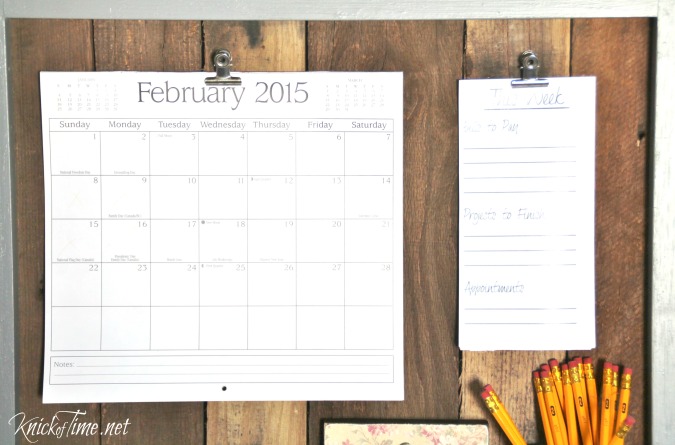

I had one finished block that I didn’t use when I was working on the Wood Photo Blocks, so I added a clip to hold my business cards.

I’ve been busting my behind to get my whole house organized this year – from closets, to craft supplies, to clutter in our entryway. I still have SO much work to do (my basement is a nightmare), but I’m going to keep purging and organizing, because being organized is much less stressful than chaos!

You can find more of my Storage and Organization projects HERE.


Great project, Angie..it looks wonderful.and who doesn’t need to be more organized?
Thanks a bunch, Linda!
I love your organization station. What tool did you use to cut the sheet metal. Thanks.
Cindy, I think they are called “tin snips”.
just love your site
thankyou for making old things new again
Thank YOU for your sweet comment, Linda!
so sauvage And so cute
friendly
kezako
This is so fabulous! And I just love that you made it all from scraps. I want to be you when I grow up! LOL
LOL – that’ll be a problem, Kathy…I’m still not “grown up”!
What an attractive and functional piece! I think it’s not only nice to have an organised space but also one that is appealing to your senses because that helps motivate you to get down to business, I find. That said, I think it’s understandable why you’ve had a difficult time getting back to your organisational habits…lack of time is always the greatest enemy in such situations. But, fingers crossed your new organisation station will give you the motivation you need to get organised just as you wish to be!
Angie- Love the project!!! Very functional, which is something I haven’t achieved yet!!! 😉 Do you have a printable for the Week At A Time?
Tess, I’ll add the printable to the blog post for you!
I love this organizer! It is rugged yet neat. I would put this on my wall any day! Thanks for the good ideas in your blog.
That turned out really nice Angie. I hope I can follow your lead and get myself organized this year.
Your blog is awesome!! I am in transition from moving from my own home to back in with my mother (3 families will be living under 1 already cluttered roof) and I need all the help I can get! Look forward to seeing more of your ideas.
Hello.i love your ideas and am ripping out a sink and counter with cabinets and I hate to see these perfectly fine things go to waste.im going to try to put couple of your ideas to use