Clementine Wooden Crate Floral Centerpiece
Step-by-step tutorial to turn a Darling Clementines crate into a charming & cheery tabletop centerpiece that is waterproof inside and can be replanted as the seasons change.

If you’re a longtime follower of my blog, you may remember the clementine crate makeover I did several years ago.
I spotted another one at a thrift store, but they were using it as a holder for comic books they were selling.
What a waste of a darling crate!
I was buying a lot of things and the gals at the register were really nice, so I ever so sweetly begged them to let me buy the crate.
I’m really good at sucking up when I want something. 🙂
They said “yes” and even sold it to me really cheap, and I knew just what I wanted to make with it …
… A tabletop garden centerpiece!
How to Make a Wooden Crate Floral Centerpiece
with Living Flowers
Supplies Needed:
clementine or small fruit crate
painter’s tape

Instructions:
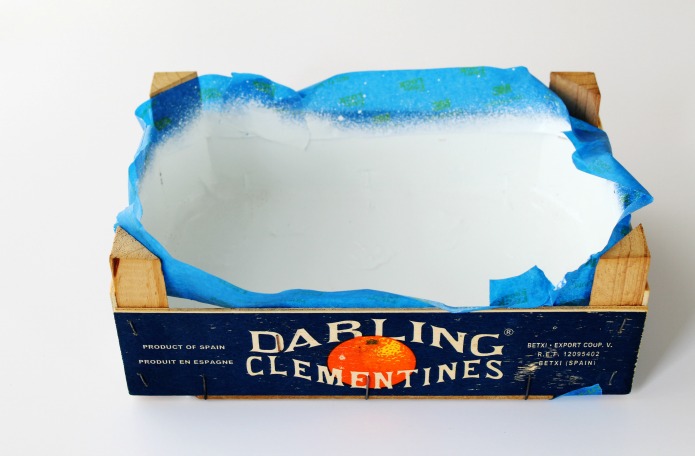
- Use painter’s tape to seal holes on the bottom of the clementine crate.
- Fill holes with latex caulk and allow to dry for a few hours, then peel off tape.
- Let the caulk air-dry completely.
- Flip the crate right-side-up and tape off edges.
- Spray several coats of Flex Seal inside the crate and allow to dry fully between each coat.
- Drill new holes where you filled the holes with caulk to allow for drainage.
- Fill inside of crate with potting soil.
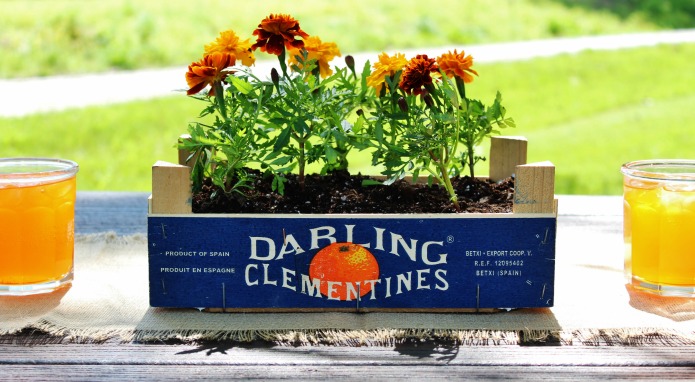
- Plant flowers of your choice and enjoy!

Caulking the holes and gaps inside the crate will keep water from leaking out.

Spraying multiple coats of Flex Seal and waiting for them to dry takes some patience, but it’s worth it.

This stuff creates a rubber-like, waterproof seal inside the crate and is amazing once it dries.
There are so many ways to use it, so it’s good to have a few cans of it in your crafting arsenal.

Fill the crate with soil, but don’t go past the line of the Flex Seal, and separate each flower so they are ready to plant.

Use a large spoon to pull back the soil and insert each flower. I was able to fit six marigolds in my crate.

Gently press the soil around the plants and give them a light watering.

Sit back, enjoy your handiwork, & smile! 🙂
I just happened to have some cans of IZZE Sparkling Clementine juice (affiliate link), so of course I had to pour some!

It was an absolutely gorgeous day out today, so I completely enjoyed kicking back and relaxing at our picnic table.
I hope you’re having a day that is just as beautiful!

Tell me what you think of my little garden-in-a-crate centerpiece in the comments below!
![]()

Vaya con Dios,


That is so charming, Angie…so much personality! Happy weekend!
Thanks Linda! I hope you have a wonderful weekend too.
Your little garden in a crate is just as sweet as can be, Angie! Gosh, I wish I could find one of those crates. I wonder if my Kroger store where I’ve seen Clementines has them in crates. Hmmn, I’ll have to check. A very cute project.
My Walmart used to have them, but they don’t anymore. Clementines are often sold around Christmas, so you may need to wait until closer to the holidays to look for them in your stores Naomi.
I’ve had one for a few years that I bought clementines in (from Publix). I’ve just had it in my kitchen (holding snacks) waiting for inspiration. Thanks! Seems like lately I’ve only seen clementines in mesh bags.
Once again, you’ve created a wonderful planter that I love!!! Thanks for the tutorial to make it waterproof, too!! 🙂
Aww – thank you Mare! 🙂
Very cute! I feel like my mom may have one (or several) of these boxes in her garage. Visiting from Merry Monday party.
Adorable! I love the look of your crate flower garden. And thanks for the tutorial. It gave me an idea!
My pleasure! I’m glad you like it Carolyn! 🙂
I love this! I’m going to be on the hunt for for a clementine crate now! And thanks for the great tip on the Flex Seal! #MerryMonday